Setting Up Google Analytics 4 (GA4) and Search Console for Your Website
- Brady Loenhart
- May 9, 2025
- 9 mins
- Technical Guides
- analytics google analytics search console seo website optimization

Part 1: Setting Up Google Analytics 4 (GA4) for Your Small Business Website
Google Analytics 4 (GA4) is a free tool from Google that lets you track how people find and use your website. It might sound technical, but don’t worry – it’s designed for all skill levels. In this first part of our guide, we’ll walk you through creating a GA4 property for your site, installing the tracking code, and giving access to a partner (like a marketing agency) without ever giving away your passwords. Let’s get started!
Step-by-Step: How to Set Up Google Analytics 4
1. Sign Up for Google Analytics
Visit the Google Analytics website and click “Get started” to sign in with your Google account (use the account you want to own the data). If you don’t have a Google Analytics account yet, you’ll be prompted to create one. (Tip: Use your business Google account, not someone else’s, so you control the account.)
2. Create a GA4 Property
Once you’re in Analytics, click the Admin (gear icon) in the lower-left corner. Under the Account column, you can create a new account or select an existing one. Under the Property column, click “Create Property.” Enter a name for your property (e.g., your business or website name), select your time zone and currency, and fill in any other business info it asks for.
Finally, agree to the terms and finish the setup. Congratulations – you’ve just created your first GA4 property!
3. Add a Data Stream
After creating the property, Analytics will prompt you to set up a Data Stream. This basically tells GA4 where data will come from (website or app). Choose “Web” as the platform, since we’re tracking a website. Then enter your website’s URL and a stream name (e.g., “MySite Stream”) and click “Create Stream.” GA4 will now generate a unique Measurement ID (formatted like G-XXXXXXXXX) for your site.
This ID is important – it’s how your website connects to GA4.
4. Install the GA4 Tracking Code
Now that you have a Measurement ID (and a tracking code snippet), you need to add it to your website so Google Analytics can start collecting data. There are a couple of ways to do this:
Use a Built-In Integration (if available)
Many website builders and content management systems (CMS) have a simple field where you can paste your GA4 Measurement ID. For example, Wix, Squarespace, Shopify, and some WordPress plugins let you just enter the “G-” ID to connect your site. Check your platform’s settings for an Analytics or Google Analytics option and paste the ID there.
Add the Global Site Tag manually
If your site doesn’t have a built-in GA option, you’ll need to copy the Global Site Tag (gtag.js) code that GA4 provided and paste it into your site’s HTML. In GA4, under your Web data stream, find “Tagging Instructions” and click “Install manually.” You’ll see a chunk of JavaScript code beginning with <script> – copy that. Paste this code into the <head> section of your website’s pages (so it loads on every page).
Note: If you prefer a tag management approach, you can also use Google Tag Manager (GTM) to install GA4 without touching code. GTM lets you add tags via a web interface, but explaining GTM is beyond our beginner scope. The two methods above will get the job done for now.
5. Verify Installation
Once the tag is installed, Google Analytics should start receiving data from your site. To double-check:
- Go back to your GA4 dashboard
- Click “Real-time” in the left menu
- Visit your website in another tab
- You should see at least one active user (you!) show up in the Real-time report within seconds
This confirms the tracking code is working. Don’t worry if you don’t see a ton of data immediately; GA4 will collect information as visitors come to your site. If nothing appears, re-check that the code or ID was added in the right place and save the changes.
How to Grant Admin Access to Your Google Analytics
At this point, your GA4 property is up and running and collecting data about your website’s visitors. Now, suppose you want to give access to a colleague or a digital marketing partner (like an agency) so they can help you analyze the data or configure settings. The good news is you don’t have to share your Google login details to do this. Instead, you can add them as a user with their own login. Here’s how to safely grant someone else access:
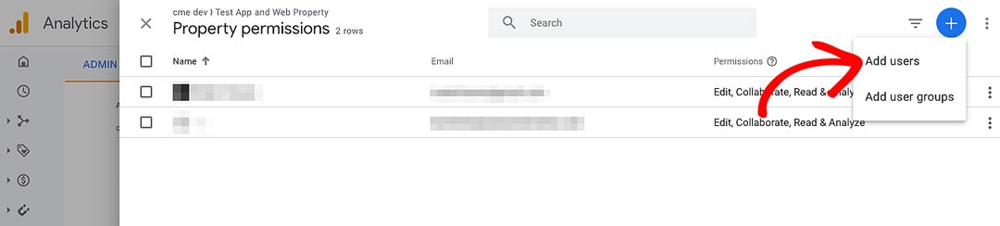
Screenshot: In Google Analytics 4, use the Admin menu and Property Access Management to add new users. Click the ”+” button (top right) and select Add users
-
Open the Admin Panel in GA4: Log in to your Google Analytics account and make sure you have the correct GA4 property selected (if you have multiple). Then, click on Admin (the gear icon at the bottom-left of the GA dashboard).
-
Go to User Management: In the Admin settings, look for the Property column (middle column). Click “Property Access Management.” This will bring up the permissions list for the property.
-
Add a New User: On the top right of the permissions list, click the blue ”+” button and select “Add users.” A form will pop up where you can enter the new user’s details.
-
Set Permissions: Input the Google-account email address of the person you want to give access to. Set their role based on what you want them to do:
- For full administrative rights (they can add other users, change settings, etc.), choose Administrator
- For the ability to create reports and modify settings but not manage users, choose Editor (this is often sufficient for a marketing partner)
Leave the “Notify new users by email” box checked so they get an email notification. Finally, click Add to save.
Recommended Best Practice: Always have the business owner (you) hold the “owner” or top-level access to your Analytics. Create the account under your email, and only grant partner agencies or employees user access. This way, no matter who you work with, you retain ownership of your data and settings.
Part 2: Setting Up Google Search Console for Your Website
Welcome to Part 2 of our series! Now that you have Analytics set up, it’s time to set up Google Search Console for your website. Where Google Analytics tracks visitors on your site, Google Search Console (GSC) helps you understand and improve how your site appears in Google Search results. It’s also free and beginner-friendly.
Step-by-Step: How to Set Up Google Search Console
1. Log in to Search Console
Go to search.google.com/search-console and click “Start now.” Sign in with your Google account (ideally the same one you used for Analytics).
2. Add Your Property
Once you’re in, you need to tell Search Console which site is yours. You have two options:
Domain Property
- Covers your entire domain, including all subdomains and protocols
- Requires DNS verification
- Recommended for most businesses
- Example: covers mybusiness.com, www.mybusiness.com, blog.mybusiness.com, etc.
URL Prefix Property
- Covers only the specific URL you enter
- Easier to verify
- Good option if you can’t access DNS settings
- Example: only covers https://www.mybusiness.com
3. Verify Your Site Ownership
For Domain Property
- Add the provided TXT record to your domain’s DNS settings
- Wait for DNS propagation
- Click verify in Search Console
For URL Prefix Property
Choose from:
-
HTML File
- Download the verification file
- Upload to your site’s root directory
- Click verify
-
HTML Tag
- Copy the provided meta tag
- Add to your site’s
<head>section - Click verify
-
Google Analytics
- Use this if you’ve already set up GA4
- Quick one-click verification
How to Grant Access to Your Google Search Console
Just like with Analytics, you might want to give another person (e.g. your SEO consultant or web developer) access to your Search Console data. This can be helpful so they can monitor your site’s search health or submit things on your behalf. You should not share your Google account login for this – instead, use Search Console’s user management to add them. Here’s how:
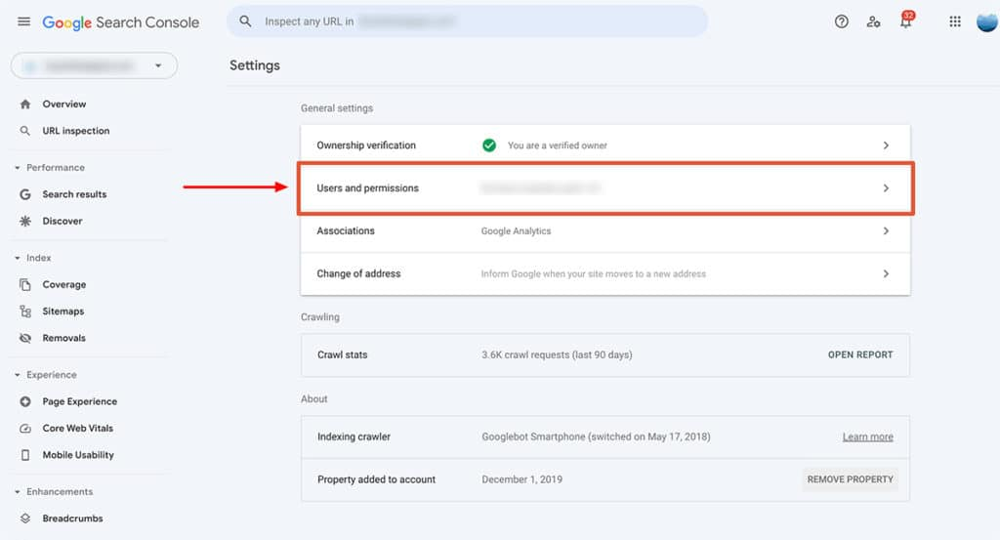
Screenshot: In Google Search Console Settings, you can manage Users and permissions for each property. Click “Users and permissions” in your verified property’s settings to add or manage users.
-
Open Settings: Sign in to Search Console and select your website property. In the left-hand menu, scroll down and click “Settings.”
-
Access Users and Permissions: Click on “Users and permissions” to see who currently has access.
-
Add a New User: Click the “Add User” button and enter their Google account email.
-
Choose Permission Level:
- Full: Can view data and take actions like submitting pages for indexing
- Restricted: View-only access to most data
Pro Tip: As the site owner, keep your Owner status intact. Ideally, you should initiate the Search Console property and then add others. This way, you’ll never lose access to your own site’s data.
Conclusion
By following these guides, you’ve set a strong foundation for your small business’s online presence. You now have insight into who’s visiting your site and how they find it. Feel empowered to explore both GA4 and GSC dashboards – you can’t break anything by looking, and the more you familiarize yourself, the more comfortable you’ll become.
Remember, if you ever feel stuck, help is available through Google’s support guides or professionals you work with. Congratulations on taking this important step in managing your online presence! 🚀